


💻 Installing VS Code & Using Git Bash, PowerShell & Ubuntu — All in One Place
- Sai Manikanta
- Jul 21, 2025
- 5 min read

For Beginners, Professionals & Anyone Looking for a Clean DevOps Terminal Setup

Let’s be real — if you’ve tried setting up AWS or DevOps tools, you've probably ended up with:
Git Bash
PowerShell
Ubuntu WSL
PuTTY (maybe)
And then you’re left wondering:
“Where should I even type my commands?”
It’s confusing. We get it. At Aarvitex, we’ve seen learners — students, job seekers, and even professionals — face this exact mess.
💡 You know what? Let’s talk about a tool that deserves way more credit — Microsoft Visual Studio Code (VS Code).
You’ll understand why this setup is worth it once you try the steps below and see it in action for yourself. VS Code handles everything from Git to cloud tools in one clean, flexible workspace.
🔧 What You’ll Learn and Do in This Blog
In this blog, we’re going to help you build a real DevOps-ready terminal setup using Visual Studio Code — the same setup real cloud engineers use daily.
Here’s what we’ll do:
✅ Install VS Code — your all-in-one code + terminal workspace
✅ Set up Git Bash — for Git and Linux-style commands
✅ Set up PowerShell — great for scripting and Azure
✅ Set up Ubuntu WSL — for AWS CLI, Terraform, Docker & more
✅ Learn how to switch between terminals easily in one window
This is a one-time setup that will save you hours and make your workflow simple, clean, and cloud-ready.
🤔 Why This Setup Matters
Let’s be honest — setting up DevOps tools across different terminals can get messy.
You start in Git Bash, jump into PowerShell, and then someone tells you to try WSL or even PuTTY...
It's a lot — and it doesn’t need to be.
At Aarvitex, we’re here to make it simple.
Instead of juggling different terminals and guessing where to run what, we’ll walk you through a clean, one-time setup inside VS Code — a tool trusted by real engineers, daily.
Here’s what this setup gives you:
A single terminal hub that runs Git Bash, PowerShell, and Ubuntu WSL
A workspace that works for AWS, Azure, Docker, Terraform, and more
A smoother learning curve with fewer distractions
Once you set this up, you're good to go — no bouncing between apps or wondering which tool to use.
Let’s get you set up, the Aarvitex way 👇
✅ Step 1: Install Visual Studio Code
Press the "Download for Windows" button on the website to start the download of the Visual Studio Code Application.

When the download finishes, then the Visual Studio Code Icon appears in the downloads folder.

Click on the Installer icon to start the installation process of the Visual Studio Code.
After the Installer opens, it will ask you to accept the terms and conditions of the Visual Studio Code. Click on I accept the agreement and then click the Next button.

Choose the location data for running the Visual Studio Code. It will then ask you to browse the location. Then click on the Next button.

Then it will ask to begin the installation setup. Click on the Install button.

After clicking on Install, it will take about 1 minute to install the Visual Studio Code on your device.

After the Installation setup for Visual Studio Code is finished, it will show a window like this below. Tick the "Launch Visual Studio Code" checkbox and then click Next.

After completing the steps above, Visual Studio Code will open up automatically — make sure the box that says “Launch Visual Studio Code” is checked. ✅

🎉 You’re All Set! So this is how we successfully installed Visual Studio Code on our Windows system.
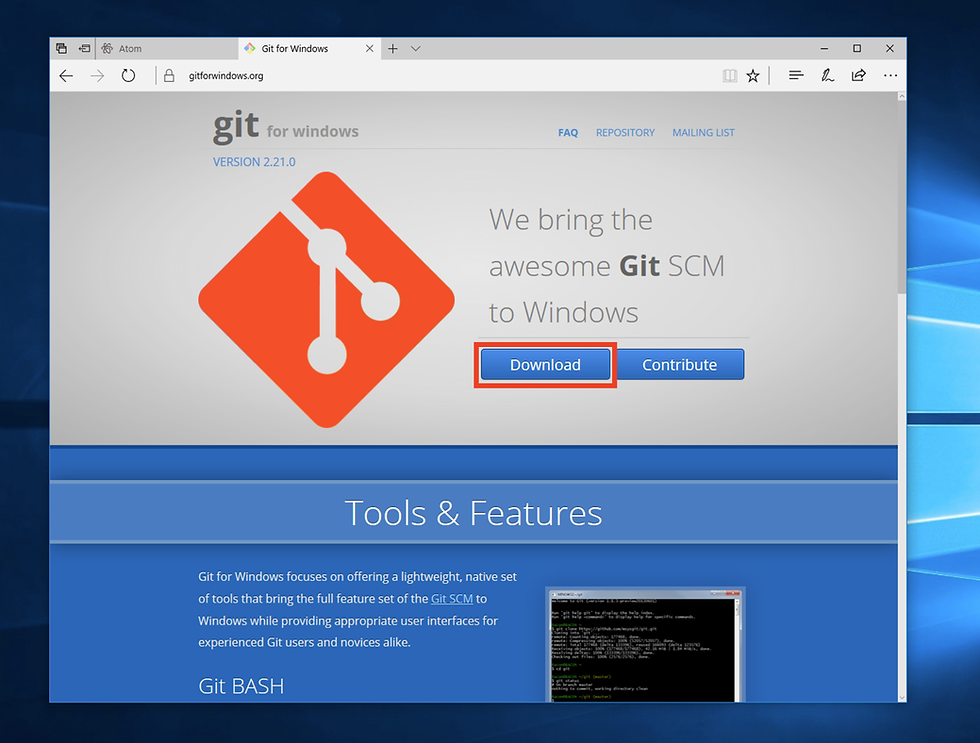
✅ Step 2: Install Git & Git Bash
Go to Git For Windows and click Download
After downloading and running the installation, hit Yes to allow for changes.

Go through the prompts hitting next each time with the default options.

Keep clicking ‘Next’ through the default options until you reach the ‘Install’ button — then click ‘Install’ to begin."

🧪 Verify Installation (Important!)
👉 Open PowerShell as Administrator and run these commands to confirm Git is installed properly:

✅ If this works — Git Bash was installed successfully.
📌 (You can also run git --version inside Git Bash to verify it separately.)
✅ Step 3: Install Ubuntu (WSL) - If Required only
Open PowerShell as Administrator.
Run this command to enable WSL:

Restart your system when prompted.
After restart, Ubuntu will auto-install. If not, go to the Microsoft Store, search for Ubuntu, and install the latest version.
Open Ubuntu from the Start Menu and set a new UNIX username and password.
🧪 Verify Ubuntu (WSL) Installation
👉 In PowerShell and run this command to confirm Ubuntu WSL is installed:

✅ If "Ubuntu" appears and the state is Running or Stopped, it means WSL is ready to go.
✅ Step 3: Finally, Let’s Play 😄 — Switch Terminals the Easy Way - In VSCode.
Once you've installed VS Code, Git Bash, and Ubuntu (WSL), you're ready to bring them all into one clean workspace — no extra tools, no terminal confusion.
Here’s how to switch between them:
Here’s how to switch between them:
Open VS Code
Launch VS Code from your desktop or Start Menu.
Then simply select ‘Terminal’ from the top menu as shown below.
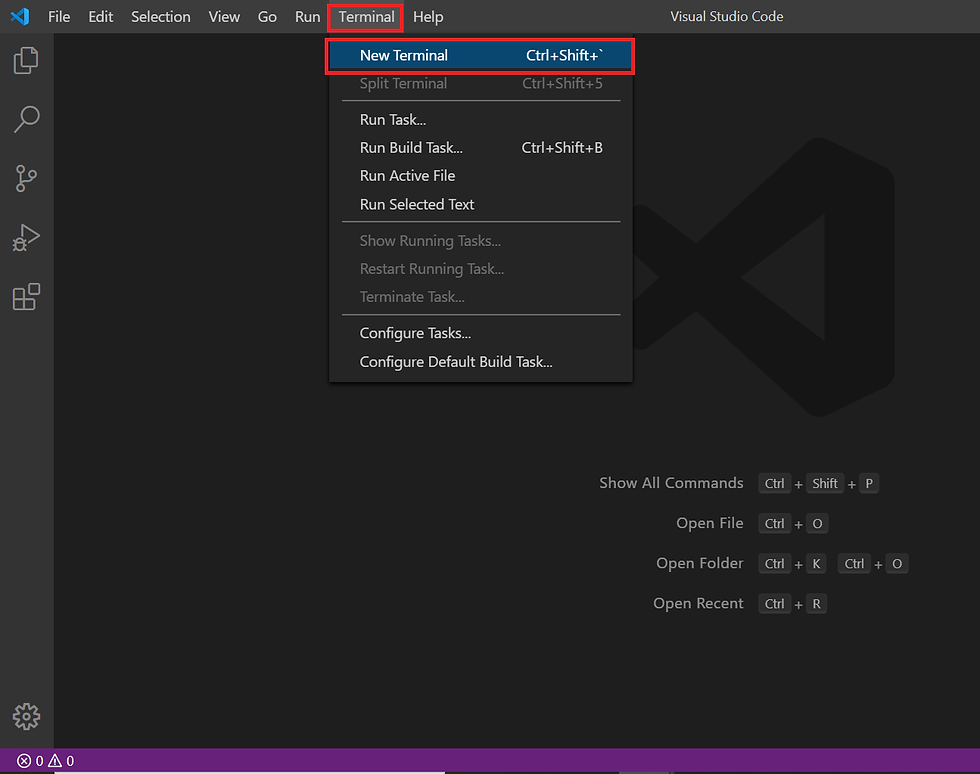
Click the dropdown (▾) in the terminal tab and Select “Select Default Shell”

Choose Your Shell You’ll now see options like:
Git Bash

Like wise choose Select Ubuntu for tools like AWS CLI, Docker, and Terraform
Restart the Terminal - After selecting, close the current terminal tab (X)
Now click on the Terminal again and select the drop down -

👉 Now you can switch between terminals based on the task:
Want to push code to GitHub? Use Git Bash
Need to automate Windows tasks or work with Azure? Use PowerShell
Working with AWS or Docker? Fire up Ubuntu WSL
That’s the power of VS Code — everything in one place, and you stay focused on learning, not juggling tools. 🎯
🔁 Bonus: Switch Between Terminals
Action | How To Do It |
Open terminal | Press Ctrl + ~ |
Change terminal type | Click dropdown (▾) in terminal panel |
Open a second terminal | Click ➕ in terminal tab |
Rename terminal | Right-click tab name → Rename |
🎉 Setup Complete!
You’ve done it — your DevOps-ready terminal is live and smooth. Everything’s inside one clean VS Code window.
✅ Final Thoughts
At Aarvitex, we make DevOps simple. We teach with real-time examples and explain every tool in a way that builds confidence.
This setup is how we help learners stop worrying and start working — the same way they would in real cloud projects.
Try it once, and you’ll see why VS Code is our favorite DevOps workspace. 💻❤️
🙋 Need Help?
We’ve got your back. Reach out anytime:
📩 Instagram: @aarvitexonline
🌐 Website: www.aarvitex.com
Let’s build your cloud career — the simple, smart way.
💬 Was This Helpful?
If this guide helped you:
❤️ Like it to show your support
💬 Drop a comment — tell us how your setup went or what you’d like to see next!
🔗 Share with friends learning DevOps or Cloud
We’d love to hear from you:
Did this make VS Code easier for you?
Got stuck at any step? Let us know — we’ll simplify it more
Curious about using GitHub Copilot in VS Code? Or want tips to customize your VS Code like a pro?
Your comments help us build better guides — and help others in the community too 💪
Comments